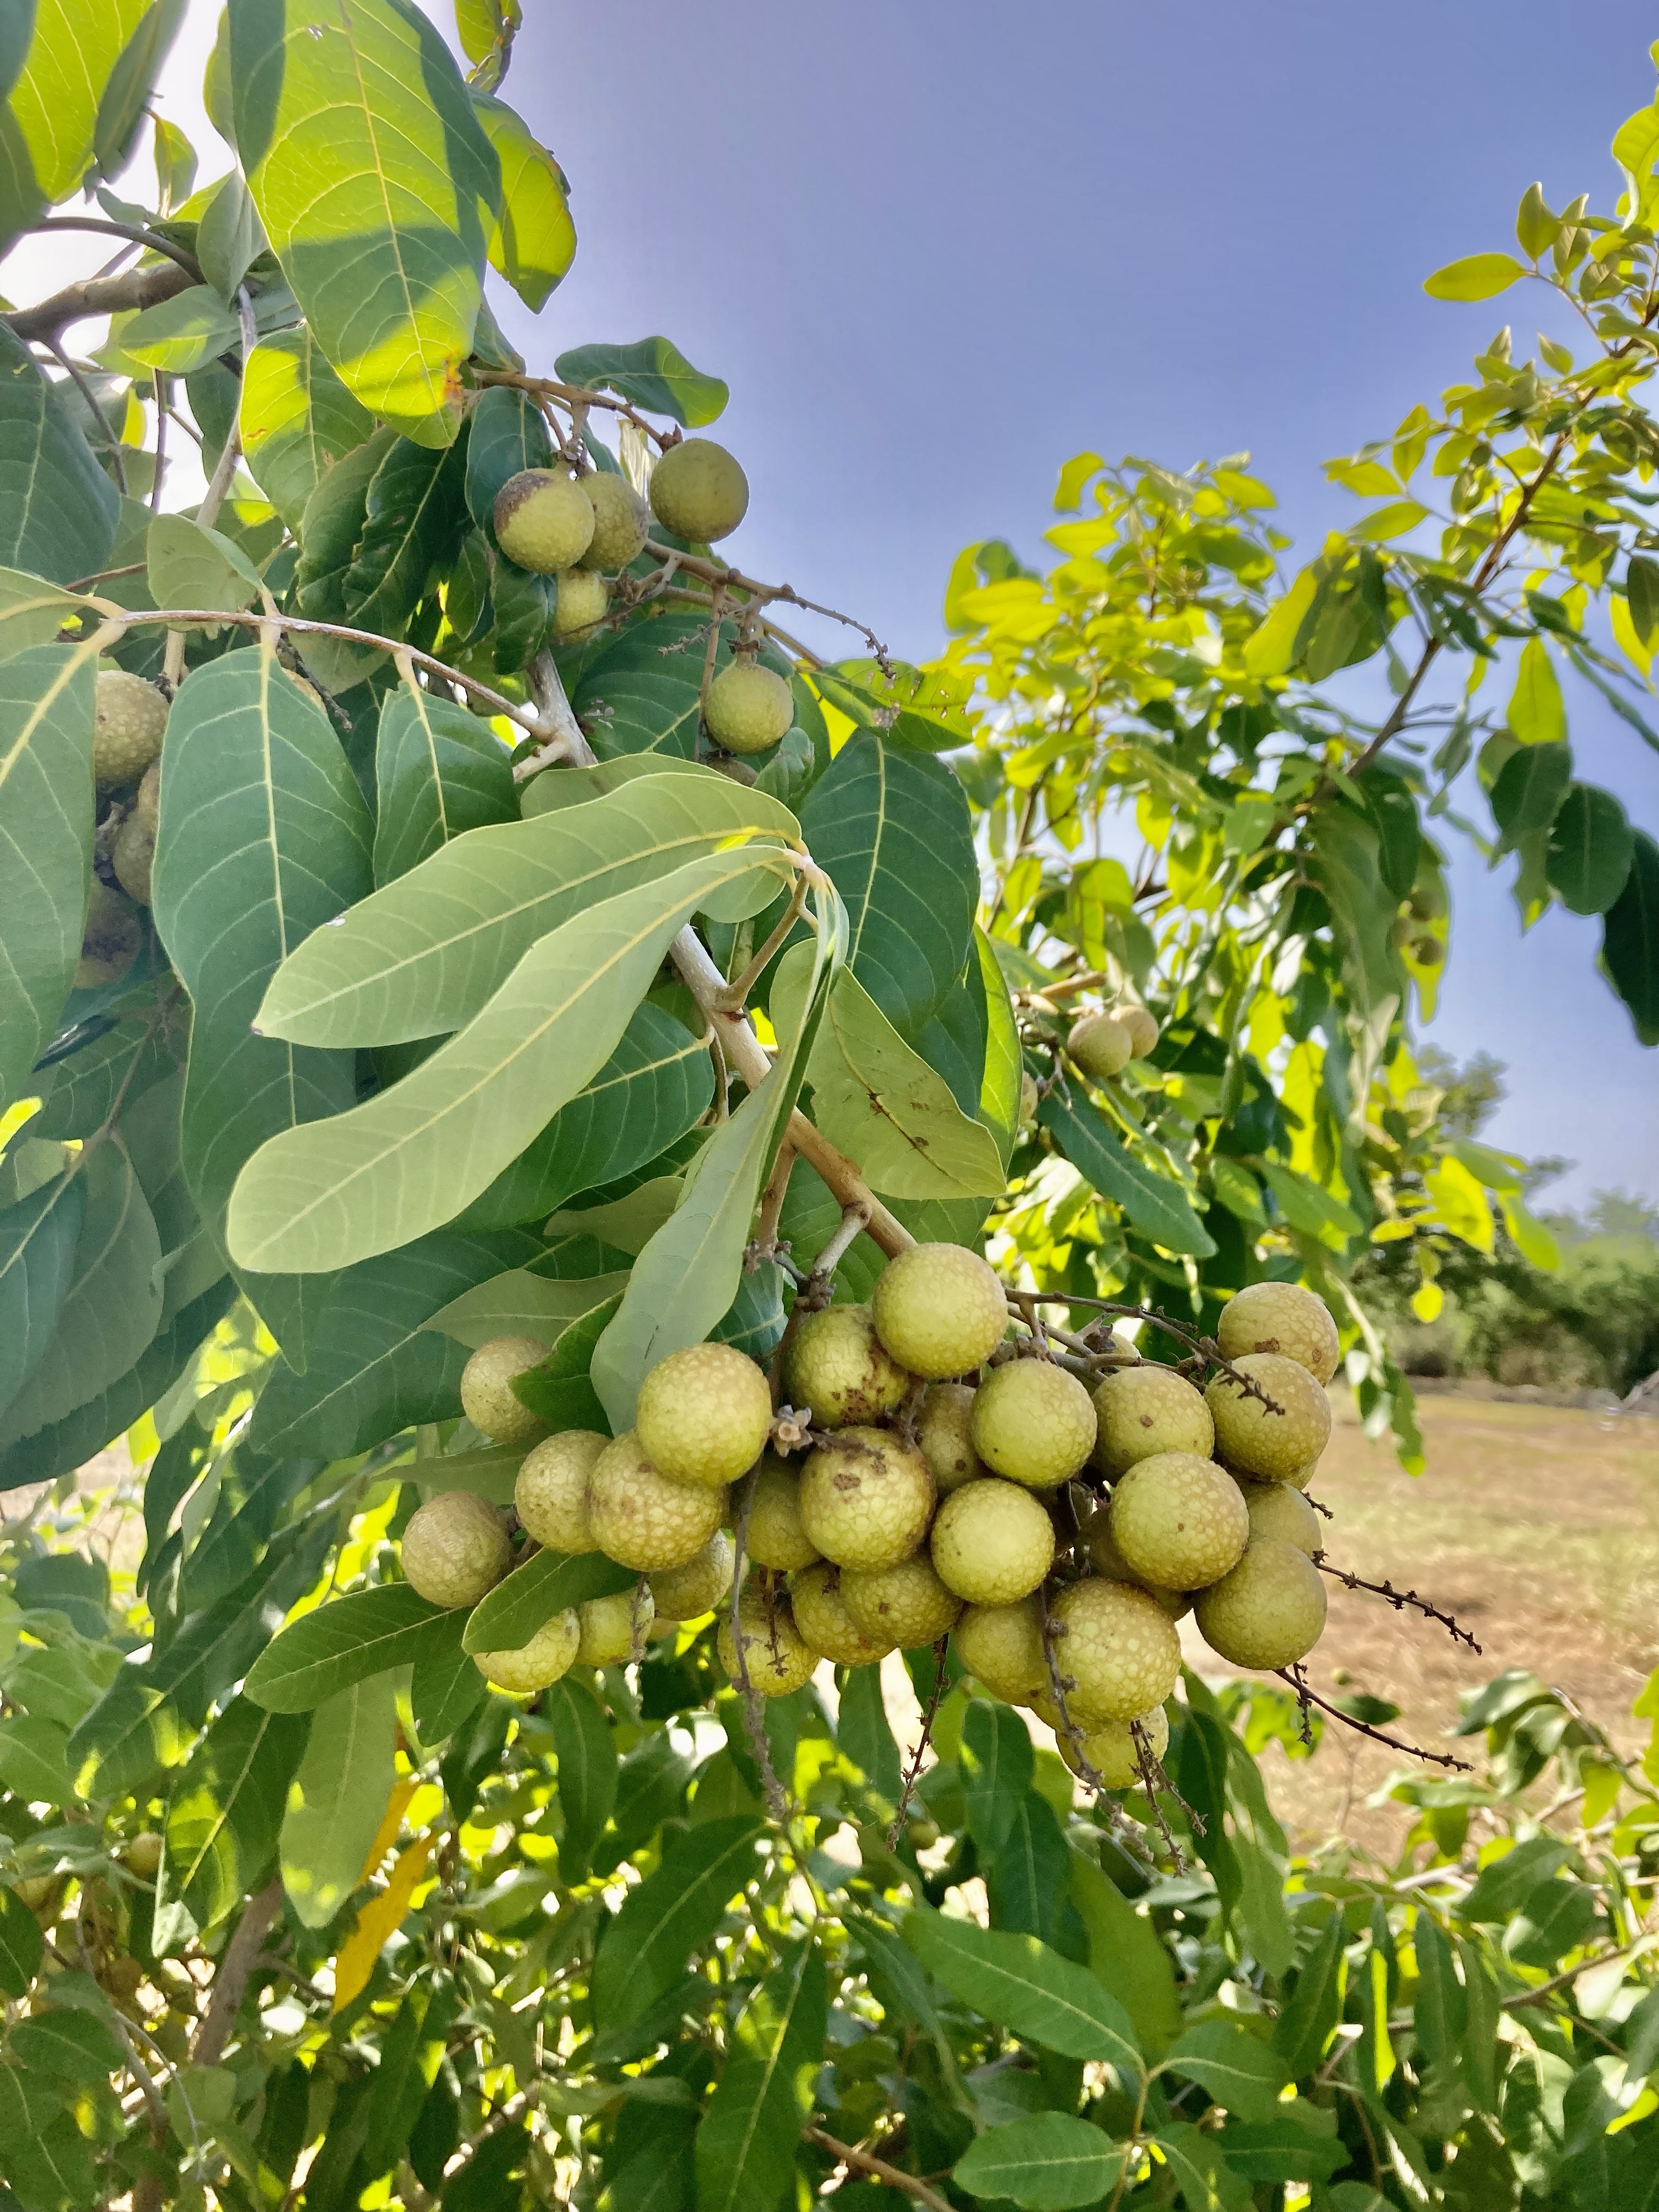
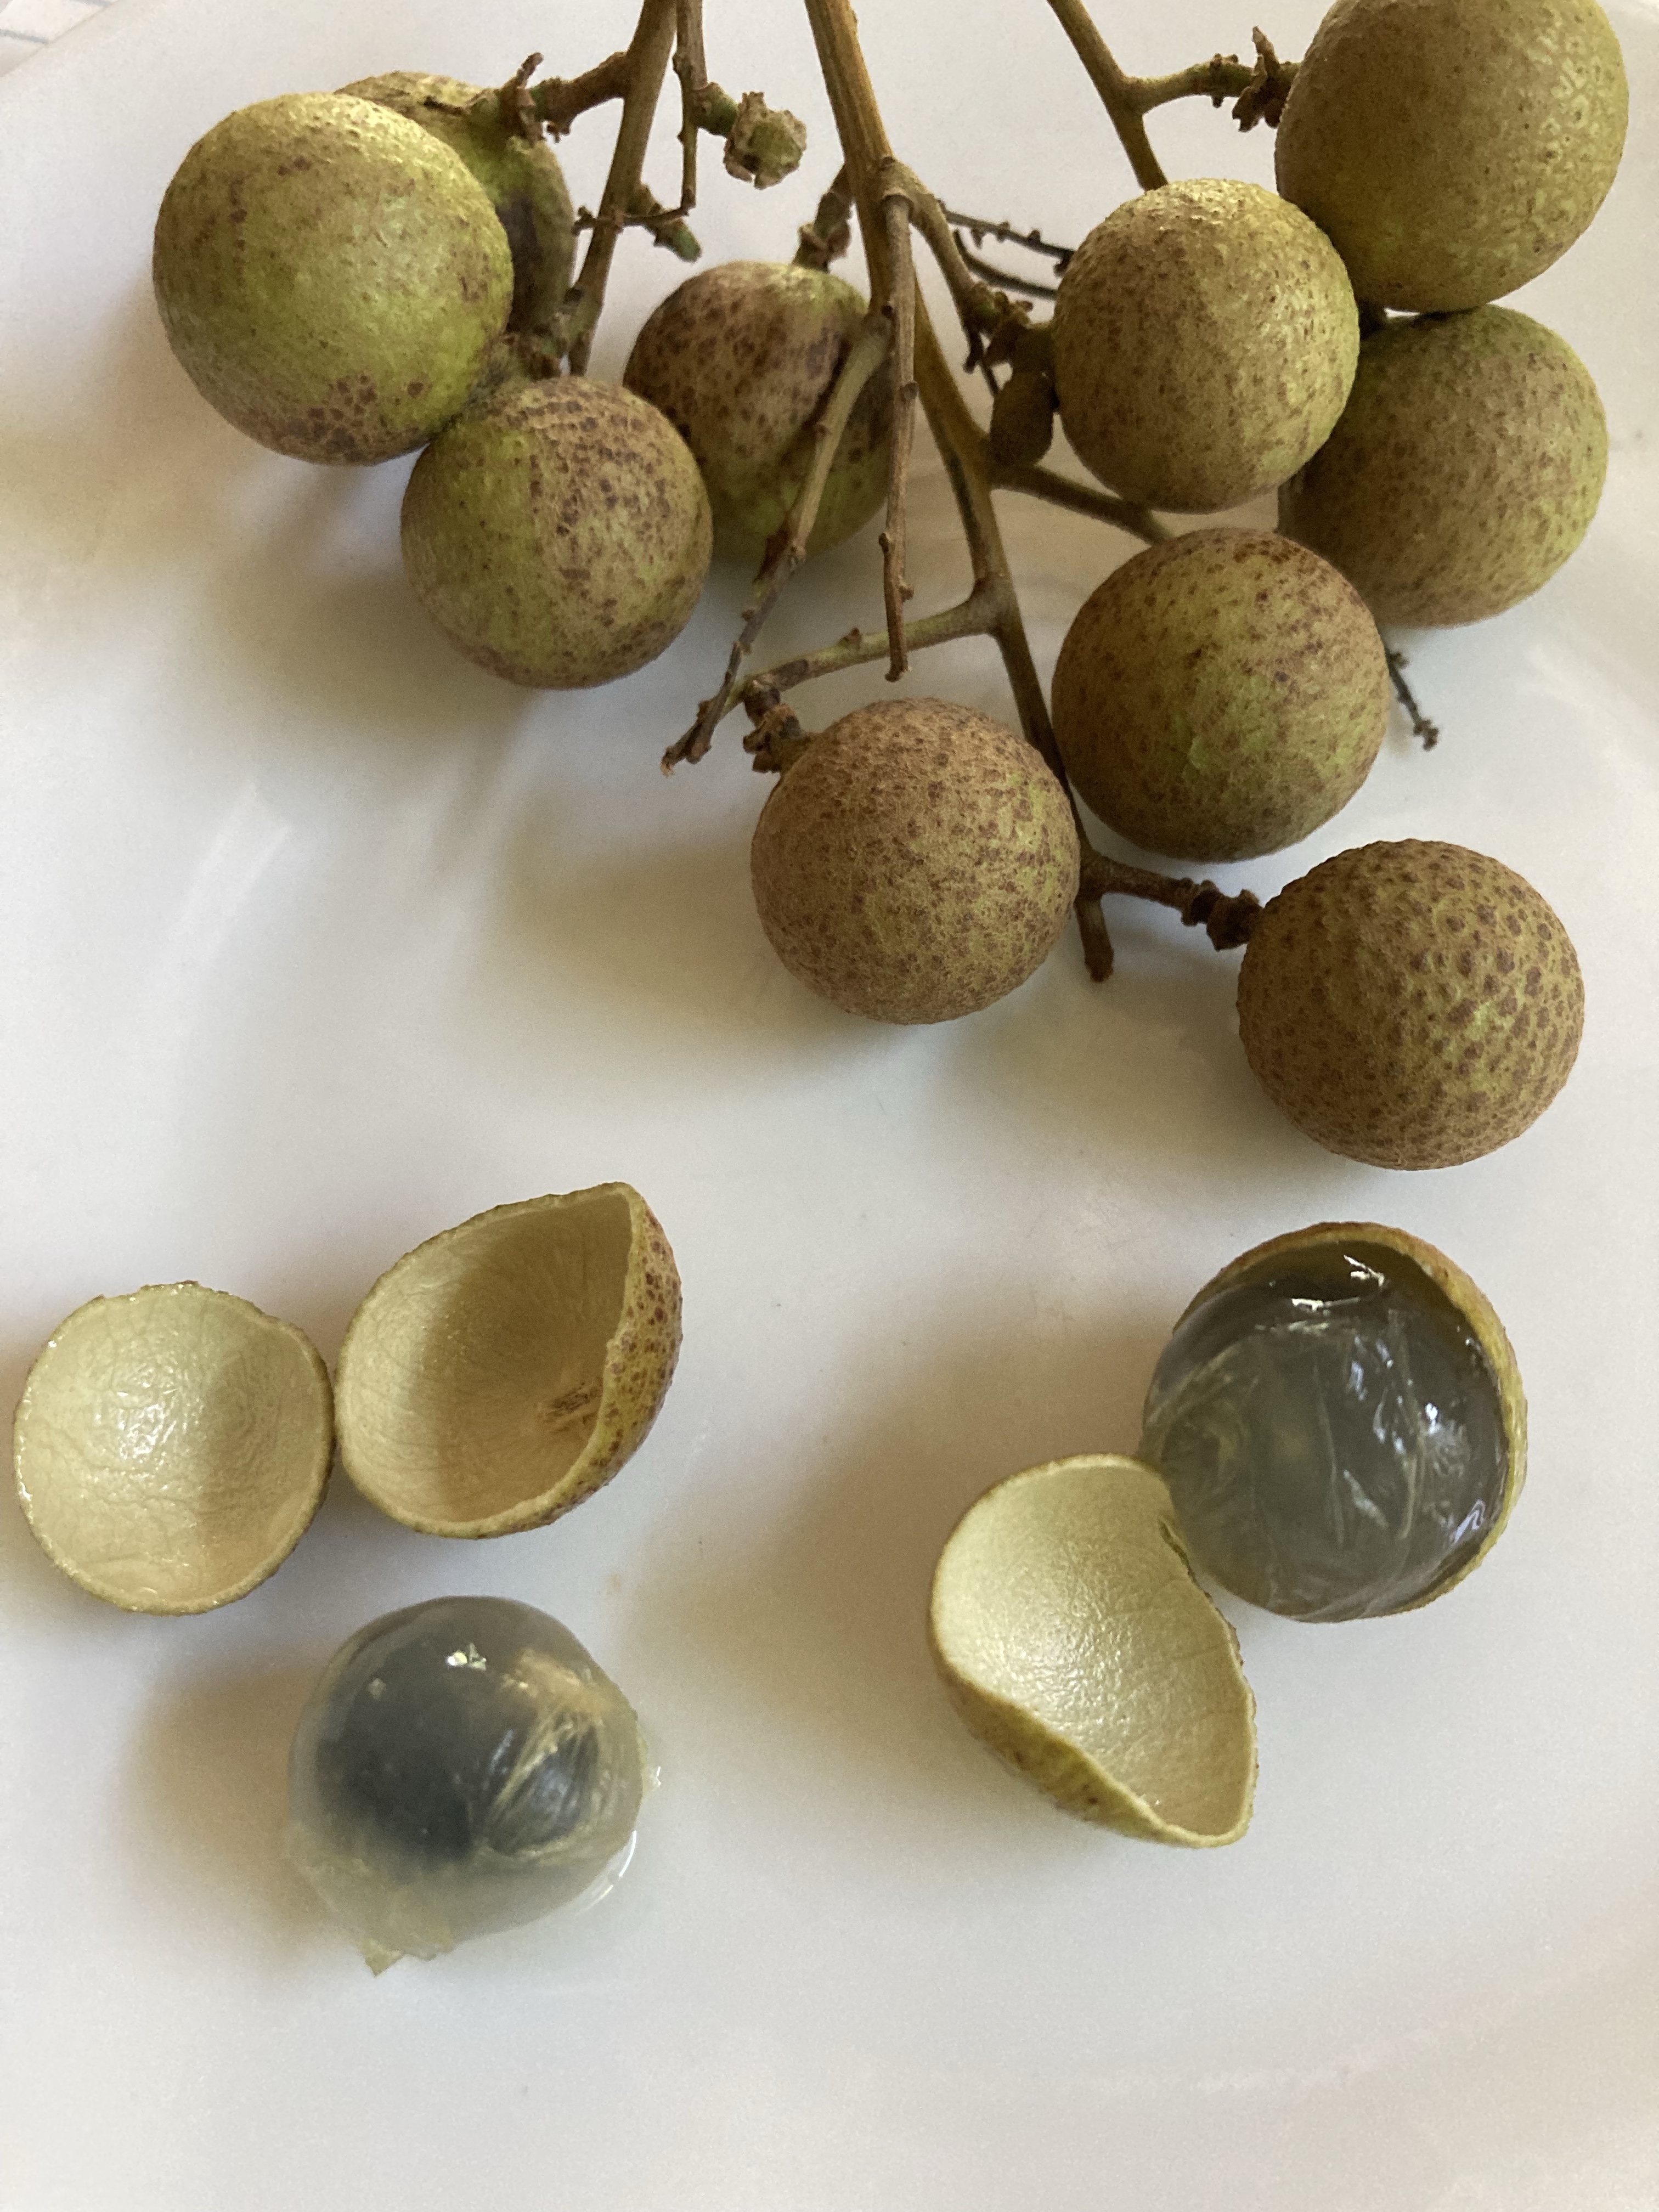
Longan fruit is a southeast asian treat, and our trees are producing a bumper crop at the moment. The so-called dragon-eye fruit is similar to a kenip but sweeter, crunchier, and comes right off the shiny pit. They are a serious addiction! AND… we have Local ground Lamb from a neighbor’s farm, pastured raised and deLicious. We’ve also got some Luscious mango varieties from Dennis Nash, fresh harvested Lemongrass (aka fevergrass – a cooling tea to keep iced in your hydration toolbox), and some pineapple sLips for planting. Early bird specials include September plums and pastured eggs from Mongoose&Zinna. We will be open for a POP-UP (no reservations, first-come first-serve) farmstand in the afternoon, Wednesday, September 6, 2023, 5 – 5:30pm.
TBT: Farmer Luca with a large wheelbarrow full of green skinned pumpkins at ARTfarm.
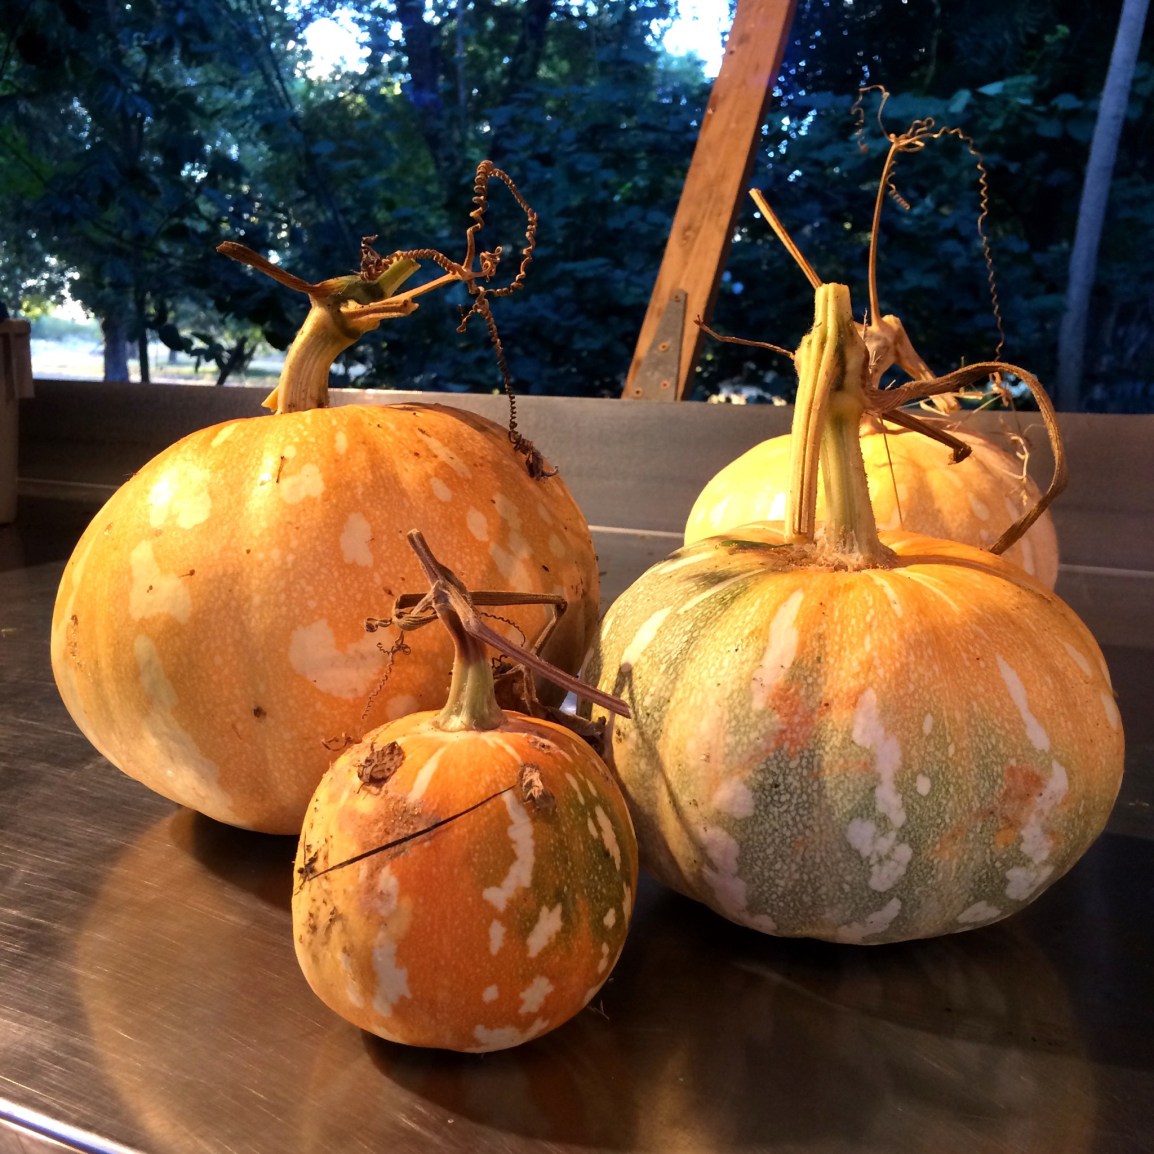
The pumpkins and butternut squashes of winter are so tempting at the farmer’s market. Purchased whole, they make lovely table decorations and can be stored for a long time without refrigeration. The warm orange hue of the edible flesh is cheerful, sweet and packed with vitamin A and fiber. Calabaza (West Indian) pumpkins, typically fat and round with vertical ribs and a deep green skin, are a traditional staple of Ital and Caribbean cuisine and are usually sold by the slice. Smooth buff-colored butternuts, sold whole, are extra sweet in flavor. At ARTfarm we love growing all of these and also squat little Asian pumpkins with thin bumpy skins, and ancient heirloom Seminole pumpkins, super sweet.
In Traditional Chinese Medicine pumpkin is used for a variety of balancing purposes, including controlling blood sugar (diabetes) and as a decongestant. But with all these varieties and uses they can feel intimidating to get started with, particularly whole ones.
Getting Started
How, one wonders, will I ever manage to pierce that thick and unyielding exterior without a chain saw?
We are obsessed with this pumpkin this winter! Offspring of Calabaza Taina Dorada from PR’s Desde Mi Huerto.
Caribbean pumpkin varieties are generally not quite as thick-skinned as the pumpkins of the great cold north. The rinds of pumpkin varieties bred for tropical places are generally so thin and tender (once cooked), in fact, that we often don’t bother to peel before eating. A very nicely sharpened 6″ or 8″ chef’s knife can easily cut off a slice of squash or halve the thing. If you’re still feeling apprehensive, resting the clean pumpkin on a folded up kitchen towel for padding can help keep it from tipping, slipping or sliding. Simply plunge the tip of your knife into the pumpkin or squash near the stem end, blade out, and then brace the top of the pumpkin as you swing the knife handle down in a masterful arc along the voluptuous curve of your squash toward its bottom. (If this isn’t easy, go back and sharpen your knife.) Voila! Repeat at least once more to release a delectable chunk from the whole. You can also cut it in half around its equator for easy roasting. And there is no law against whole roasting a pumpkin, although it may take a bit longer. Wrap it in foil and tuck it into your bonfire!
When everything else in 2020 has gone sideways you’ll rely on this nutritious, rich tasting winter vegetable. It’s sweet and tastes great in EVERYTHING.
Now to prepare:
Pumpkin can be steamed, roasted, fried, shredded into dishes, or eaten raw. The basic preparation after washing and cutting, is to:
Scoop out the innards. (Save the seeds – clean them off, then plant in your garden, or toss with oil and salt and roast for a snack!) You can stop here and eat it raw or chopped and sauteed or grated onto things, and it will keep a week or more in your fridge. – OR –
Roast up a halved squash or whole pumpkin slice in a buttered or oiled baking pan. 350ºF oven ’til easily pierced with a fork, maybe 20-60 minutes depending on the size of your pieces. – OR –
Steam it cut side down in half an inch of water in a covered skillet until the skin is soft/piercable with a fork. Then get creative: here are at least ten quick and efficient ways to add pumpkin to your meals:
Eat a savory moist warm slice, right out of the pan or oven – like a slice of pizza with salt and pepper (skin too!)
Eat a sweet warm slice, right out of the pan or oven – like pie, drizzled with a little melted butter, pie spice and coconut sugar! Easiest dessert EVARRR!
Scoop a few generous spoonfuls of roasted or steamed pumpkin into any slow-cooking savory dish (OMG tomato sauce! stew! mac & cheese! rice! casserole! beans!) to sweeten and thicken sauce
Finely grate raw pumpkin into your morning oatmeal, pancakes or waffle batter with cinnamon, ginger and nutmeg before cooking; toss a few pecans on top for a holiday-pie flavored breakfast
Save in the fridge and toss big spoonfuls into a smoothie or other snack
Process steamed or roasted pumpkin further into purée and use as canned pumpkin, for a creamy soup base, or freeze in an ice cube tray for future inspiration
Feed it to babies!
Try eating pumpkin raw: trim off the skin, slice the flesh thin like a tortilla chip using a mandolin, and have it with garlicky hummus!
Instead of roasting or steaming whole or large slices, chop slices into bite-sized chunks and add to sautées and stews, beans, stir-fry…no need to remove the skin
Use in cakes, custards, cookies, breads, muffins, homemade pasta, ravioli… ours never lasts that long…
You can stop buying canned pumpkin and make your own fresh hot puree in about 15 minutes start to finish. But good luck making it all the way to puree… it smells so amazing, we always end up eating it first. Reserve any leftover steaming or straining liquids for cooking, or to make your pooch happy.
Ingredients
Fresh pumpkin
Water
A skillet or roasting pan
Directions
Wash the pumpkin skin. Carefully, with a large sharp knife or cleaver, cut into halves or quarters, removing seeds (they are a great snack roasted with salt!).
Steam the pieces cut side down in half an inch of water in a covered skillet for 10-12 minutes or until the outside skin is soft/easy to pierce with a fork, and then…
Scoop the soft cooked flesh from the skin. Mash it with a masher, blend or food process it for a smoother puree if desired, and use a strainer or nut milk bag to remove some of the moisture if you’re using it for baking.
Grandma's Midwestern Pumpkin Pie
Servings: never enough, but maybe 8 slices?
Difficulty: Easy as pie. The crust is always the hard part.
1 1/2 cups heavy cream (or 1 12oz. can evaporated milk) (or extra-rich coconut milk)
2/3 cup coconut sugar
1/2 teaspoon salt
2 local farm fresh eggs plus the yolk of a third egg
1 teaspoon ground or 2 tablespoons fresh ginger
1/4 teaspoon cloves or allspice
1/4 teaspoon nutmeg
2 teaspoons cinnamon
1/4 teaspoon ground cardamom
1/2 teaspoon lemon or sour orange zest
1 9″ pie crust of your choosing. Does not have to be pre-baked.
Directions
Preheat your oven to 425ºF.
In a large mixing bowl or your blender, beat the eggs, then add sugar and spices. Mix in the pumpkin purée and stir in the cream. Mix well. I like to use the Vitamix for this, especially since I’m always making a double batch.
Pour the filling into your favorite (unbaked, unless you insist) chilled pie crust (frozen is fine) and bake for 15 minutes at 425ºF, then lower heat to 350ºF and bake another 45-55 minutes. Watch the edges for over-browning and use a foil collar or pie protector to keep them from burning. Bake until the center is slightly jiggly but mostly firm and a pie tester comes out mostly clean but not necessarily dry.
Cool the pie on a farmhouse windowsill with gingham curtains near the railroad tracks for about two hours. It will deflate as it cools and develop some lovely cracks to hold the whipped cream.
Nutrition
Per Serving: 420 calories; 29 g fat; 39 g carbohydrates;
5 g protein; 125 mg cholesterol; 310 mg sodium.
This tradititonal Thai street food is a sweet custard is steamed inside a small hollowed out pumpkin or squash, and you eat the entire thing, tender skin and all.
Before we were farmers, we lived in Brooklyn NY. There was a family-run Thai restaurant in a little upstairs space on 7th Avenue in Park Slope. We would walk many chilly blocks there from our apartment in Sunset Park/Atlantic Avenue in the winter to eat some spicy Thai chili soups, and would always end the meal with this amazing dessert when it was available. Some dishes you just never forget!
This recipe is best with acorn squash and other smallish, squat-shaped pumpkins.
Ingredients
1 whole sweet baking squash about 2-3 lb or 6-8″ diameter (or several smaller ones)
10 cups of water for steaming
4-5 large farm fresh eggs
3/4 cup coconut milk, full fat
1/3 cup coconut sugar (traditional recipes use palm sugar)
pinch of salt
pinch of cinnamon
1 teaspoon vanilla extract
bamboo or stainless steamer basket, to hold the whole pumpkin; large lidded pot to hold the steamer for cooking; you could probably do this a lot faster in an instapot, or other pressure cooker?
Directions
Wash a 6-8″ diameter (2-3 lb) whole pumpkin or other winter squash. Cut an outward-angled circle around the stem end as if you were making a jack-o-lantern for Halloween. Remove the top and scoop out the soft core of seeds and fiber. If needed, slice a very thin layer off the bottom to allow the pumpkin to sit flat.
Start your 10 cups water to boil in a large steamer.
Beat the eggs with the spices, vanilla, sugar and coconut milk until the sugar is dissolved.
Pour the custard mixture into the hollowed out pumpkin.
Place the pumpkin and its stem-lid (to the side) in the steamer basket in the pot once the water is boiling. Don’t put the pumpkin’s own lid back on itself, but cook it alongside. Place the lid on the pot and steam for about 45 minutes, or until a fork comes out of the custard clean.
Remove the steamer basket from the pot and let the pumpkin cool.
When you are ready to serve, use a large sharp knife to cut a wedge out of the pumpkin like a pie. The custard should be firm. Serve at room temperature. The entire slice is edible, including the skin. Refrigerate any leftovers. Yeah, right!
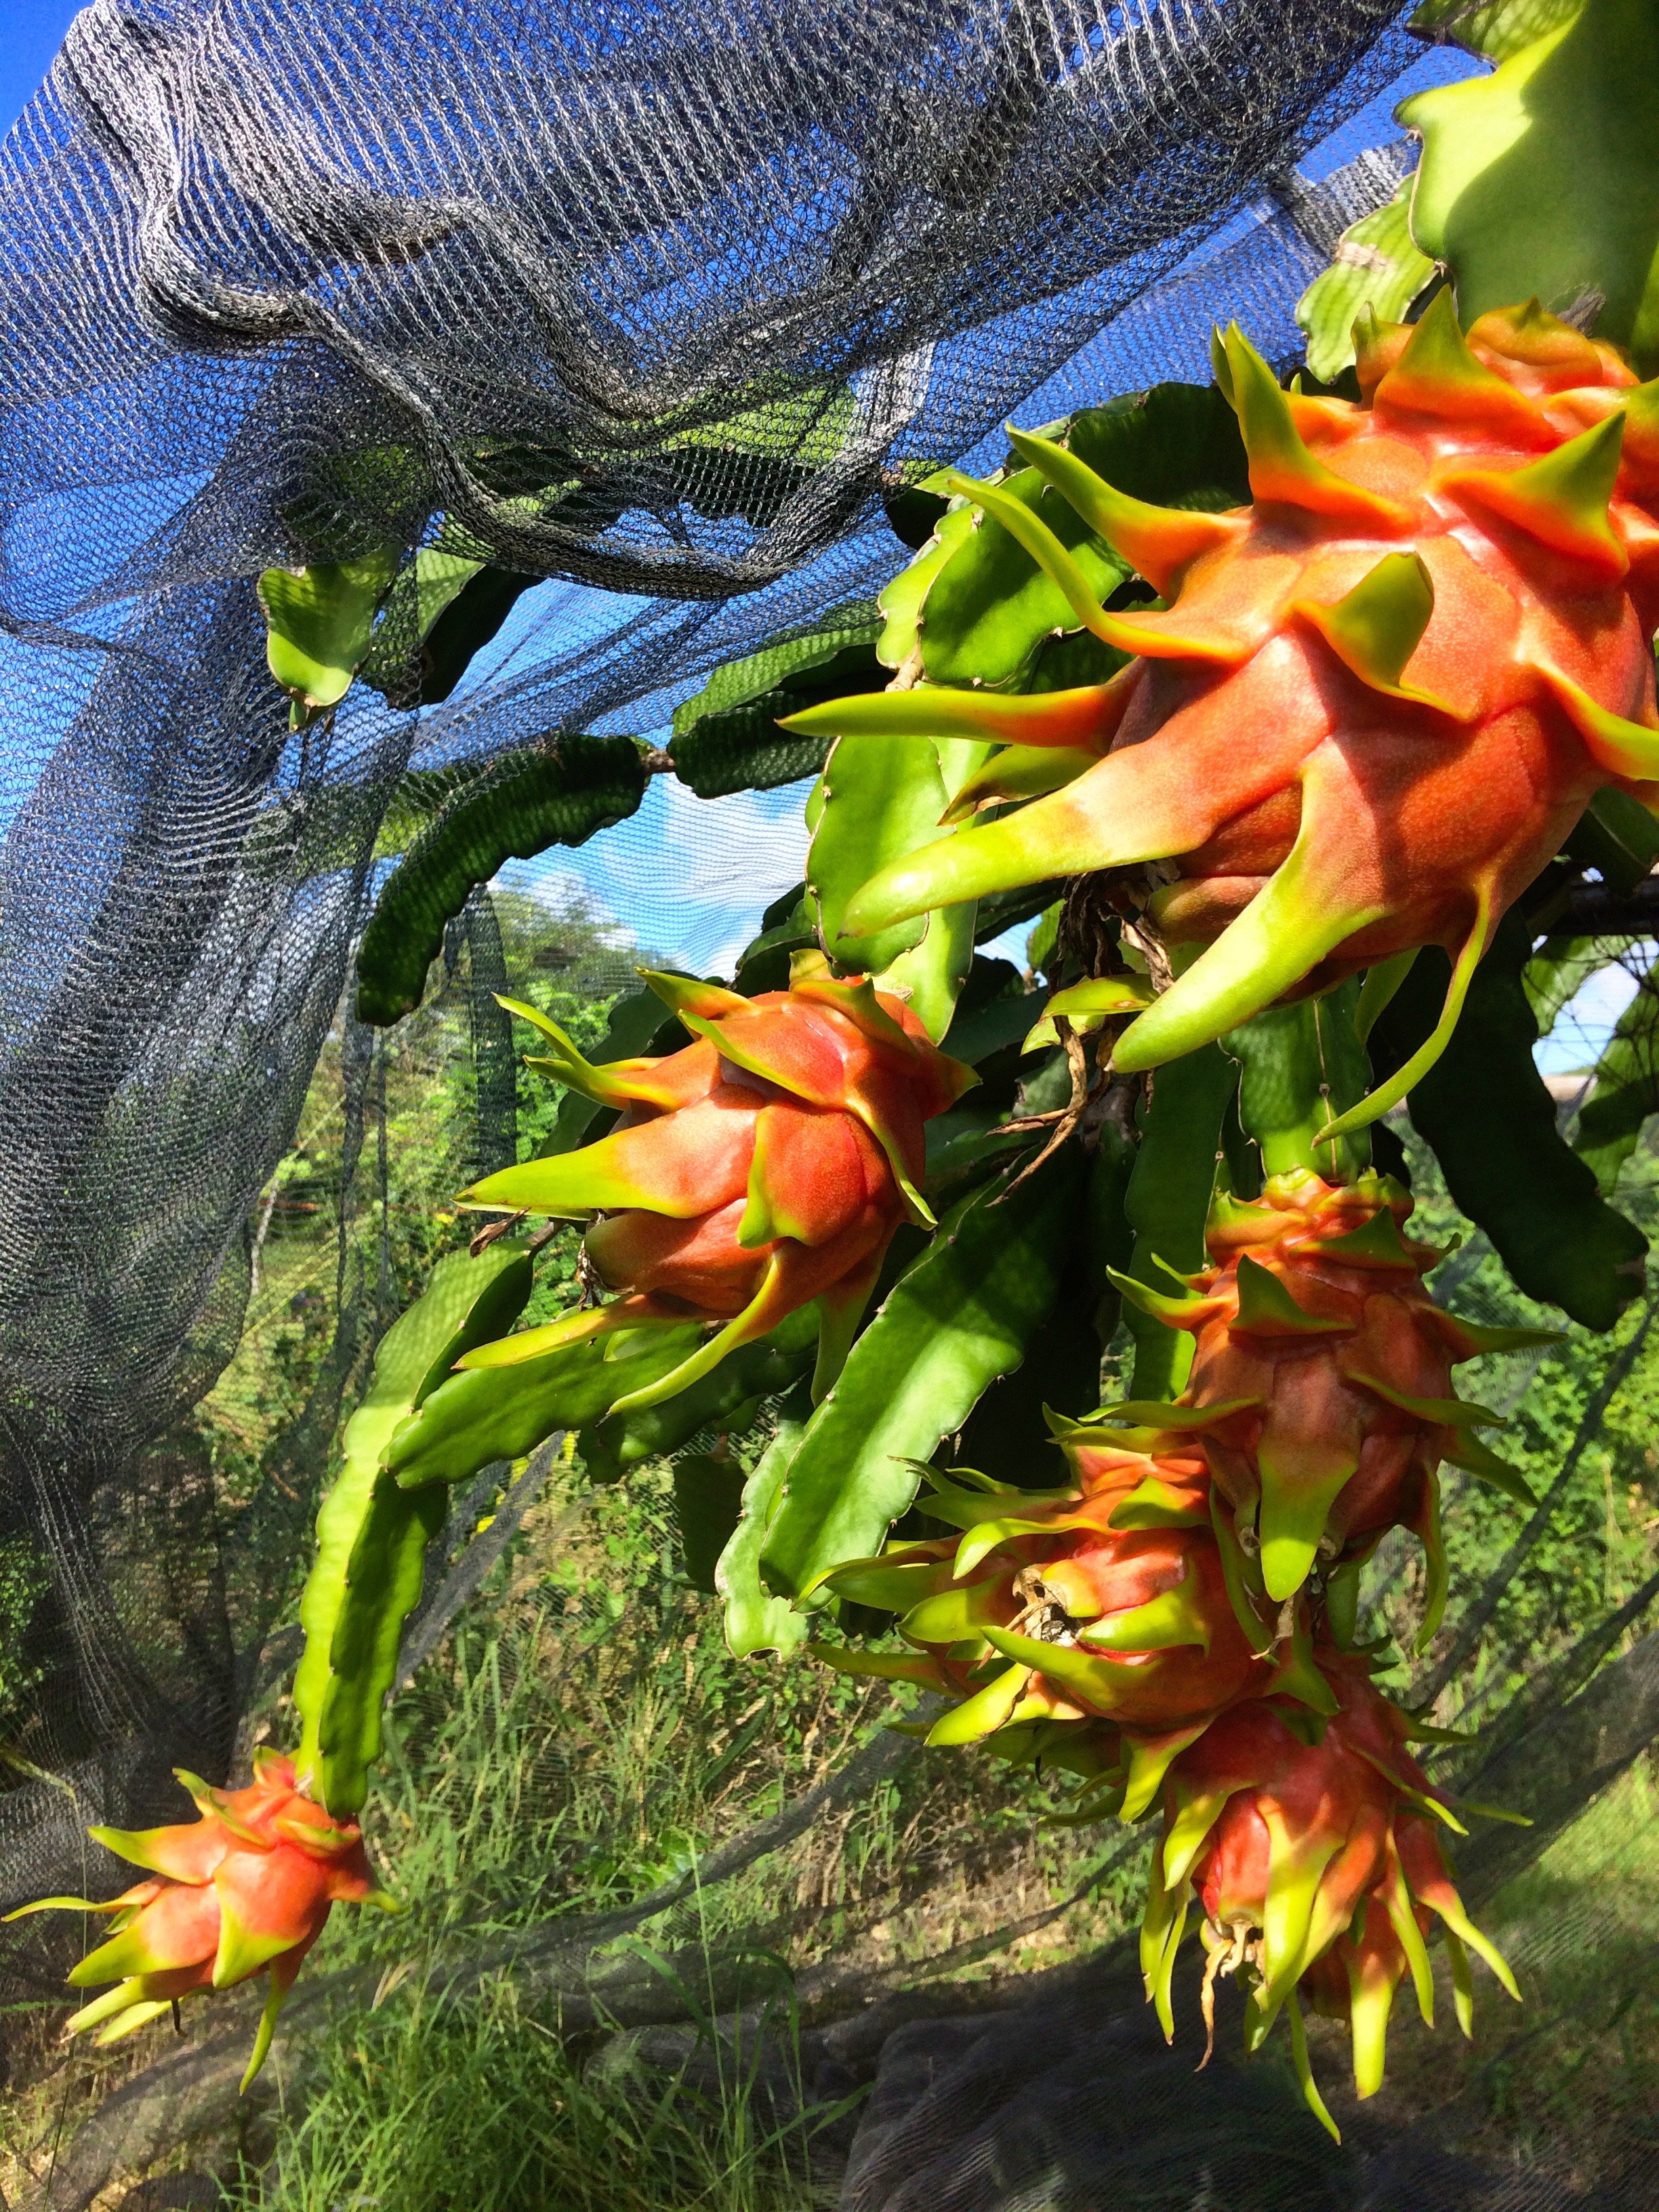
We sell delicious ripe sweet dragonfruits (also called pitayas) at ARTfarm, but we also occasionally make cuttings available so you can try your hand at dragon farming. These domesticated cousins of the wild night-blooming cerreus are relatively easy plants to grow in the subtropical climate of the Caribbean, and can tolerate full sun or partial shade. Dragonfruit is a climbing cactus vine of spiky green triangular sausages whose care leads to some odd bedtime habits: certain varieties need to be hand pollinated, and the blooms only open at night. This article will get you started, and then you’ll want to search the web for more details. Welcome to our obsession:
Planting Your Dragonfruit Cutting
Water, water, anywhere? Look closely to see what Farmer Luca saw: A tiny anole lizard licking moisture off of a dragonfruit bud in the dry pasture.
Beware of the sharp spines! Your cutting is pretty tough and can wait a few weeks to be planted in a pot or in the soil and start its upward trajectory. In fact, the cut end should be fully cured and dry before planting.
So take your time to find the perfect spot: this desert plant becomes incredibly heavy as it grows up and up, so if you put it on a weak structure the vine will eventually pull it down. The vine can handle shade or full sun, thus a large tree seems like a perfect sturdy natural support; but left to its own devices, the dragonfruit vine will eventually grow high up out of your reach for pollinating and picking the fruit. The roots can adhere to many surfaces and will grow up walls, too. For cultivation practicality, we’ve found a sturdy wooden fence or trellis is best. At ARTfarm we have had better luck on 3-4 foot high fences rather than single-support trellises (as the vine gets heavy, some of our ‘tree shaped’ single-post-supported vines have fallen over when rain events soften the soil). A wattle fence is a simple, attractive, ecofriendly and inexpensive way to create a support for your dragonfruit vines. We made one near the ARTfarm farmstand entrance from manjack cuttings. Whatever growing structure you choose, keep the vines out of reach of livestock and deer, who enjoy munching the juicy interior of the vine segments.
When you’ve found a good spot, take a close look at your dragonfruit cutting: it’s directional. The spines should point up. Plant the cutting’s bottom end 1″ into a one gallon or larger pot to start, with a stake or other temporary support to climb, or plant it directly in the ground near the support where you plan to have your vine grow. Once you see some growth on the top of the cutting, you’ll know it has rooted in the soil.
Dragonfruit Vine Care
Dragonfruit (pitahaya) ripening on the vine.
These tough desert vines are a relatively slow growing plant so be patient and prepared to wait up to several months before you see initial growth from your cutting.
Dragonfruit vines do need some water, but not as much as other plants. Once well established, especially on trees in a well-drained spot, we find they will survive and thrive without irrigation. They will develop roots all along the green segments, against the support you provide. The vine absorbs water from the air and from the surface they grow on. But depending on conditions they will also need regular watering with good drainage as they get established. They don’t want a wet spot but prefer to dry out between waterings. The smooth green segments of the vine will start to look wrinkly if it is thirsty.
If you prune the dragonfruit vine by cutting in the center of one of the green sections, it will often branch. So if you choose a tall support like a tree or wall, you can chop the growing tip of the vine in half as it grows and it will bush out and start to arc gracefully downward. You can also add more cuttings along the bottom of your structure, to keep the vine dense but within reach. There are industrial dragonfruit farms in Vietnam with thousands of vines on concrete posts, and the profuse spreading growth from the top makes each vine appear like a strange palm tree.
Flowering and Pollinating
Dragonfruit vines put out fruit buds near the tip of their length.
Dragonfruit vines need to grow to a certain overall length before they will flower and fruit. This reproductive effort doesn’t start until the cutting has grown into a fairly substantial vine of six feet or more; it can take up to two years from planting to fruit from cuttings, even longer from seeds. But once they start, you’ll see buds forming along the edges of the outer segments of the vine.
How many of you are old enough to remember the R.E.M. song “Gardening At Night”? Dragonfruit blooms only open after 8pm, and often need to be hand pollinated in order to bear fruit. So forgive us if we’re a little sleepy!
The dragonfruit is the domestic cousin of the rarely-flowering night-blooming cereus. It is a night blooming cactus vine. Like the night-blooming cereus, each large, showy dragonfruit bloom is active for only a single evening, generally opening after dark and closing by mid-morning the following day. Night pollinators such as bats and moths can pollinate the dragonfruit, but for the most reliable harvests you’ll want to research further into how to choose, collect, and apply dragonfruit pollen to your open flowers at night.
Different varieties of dragonfruit pollinate themselves and each other differently. Natural Mystic has a high success of blossoms turning into fruit. Physical Graffiti doesn’t seem to self-pollinate, so it’s not a bad idea to have both varieties planted so they can pollinate each other to make sure fruits will form. Farmer Luca has experimented over the years and now pollinates all his blooms with pollen collected within 24 hours from newly opened Natural Mystic blooms.
Once the flowers are pollinated and have closed, you can prevent end rot in the developing fruit by trimming the excess wet petals from the tip. Birds and other wildlife love delicious ripe dragonfruit, so we often protect the fruit from damage with reusable fabric mesh bags.
Harvest
Heavy basketloads of fresh ripe dragonfruits at ARTfarm
To harvest the ripe dragonfruit for immediate consumption, you can twist the fruit and break it free of the vine. We prefer to use a hand pruning tool and cut the small portion of attached green stem away to free the fruit without damage.
Good luck with your new dragonfruit cutting! Wishing you fun nights of pollinating under the stars!
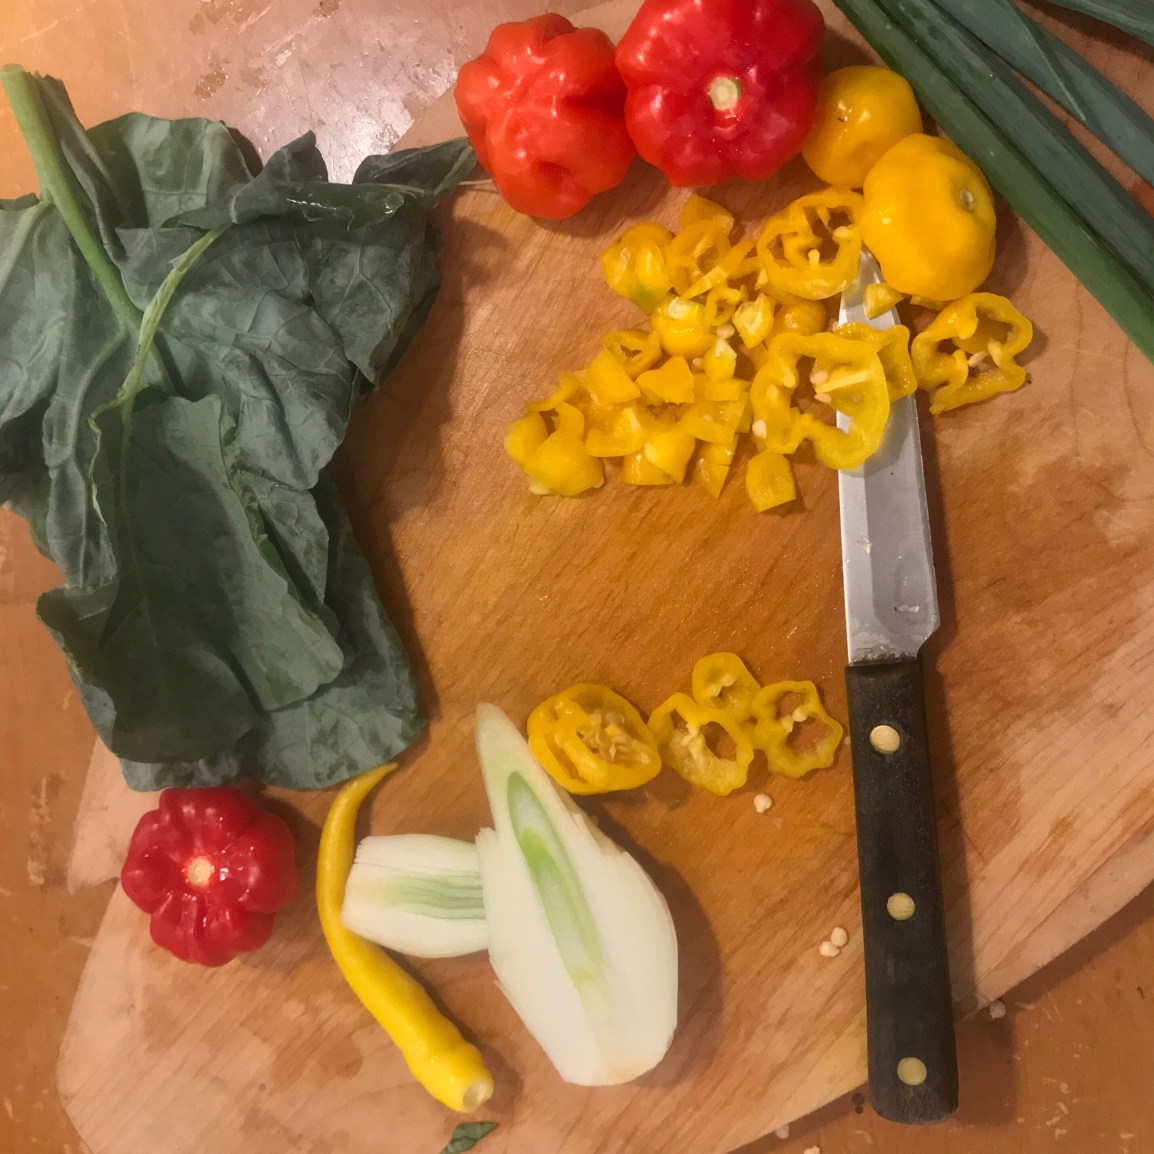
Being a season of viruses, we’ve definitely been cooking up some antiviral recipes lately that can be prepared with or without meat. Late spring is sort of the beginning of the winding down of our veggie season at ARTfarm, but ingredients can be sourced from other local farms or your own backyard Victory Garden. The recipe ingredients list seems long here, but in these days of social distancing we thought it best to give people lots of options and substitutions. It’s mostly a lot of chopping and preps quickly.
Our ginger and turmeric have such tender skins they don’t need peeling. Just wash, chop and go!
We will be presenting a series of articles on starting a small home garden for those of you who have been asking us what to plant and when. Stay tuned on our website, we’ll be offering some information and also soon put up a signup sheet if you’d like to attend a Zoom videoconference class with local experts from UVI’s Cooperative Extension Service to answer more of your questions on starting a home garden.
Tom Khing Michi-Gai Phak*
(Ginger Not-Chicken Coconut Soup)
Feeds about 3 hungry people who really love soup. We usually double it. 10 minutes prep time, 40 minutes cook/simmer time.
This is a garden veggie heavy/homemade sort of homage to one of ARTfarm family’s all time favorite Asian soups: Galangal Chef Kenneth Biggs’ Tom Kha Gai soup. We are substituting ginger and turmeric for Chef’s galangal root and adding more veggies.
The coconut is nourishing and anti-viral, the turmeric color is cheerful, the gingery warmth of the rich smooth broth and onions and chili peppers (if desired) help open the sinuses without acidity, the customizable, whatever-you’ve-got-available veggies make it hearty; it’s just soothing and lovely. The citrus tang and floating cherry tomatoes added at the end offer little pops of sweet vitamin blasts and the cilantro is cleansing to the body.
This recipe is verrry adjustable. You can make it with some, or all, or substitutions for, the various chopped vegetables and herbs in this recipe. Tiny white Japanese enoki or bonapi mushrooms are a fun texture in this if you can get them, but any (or no) mushrooms will do. (Mushrooms may have anti-viral qualities!) This is traditionally a chicken recipe and we’ve suggested tofu or a light milder fish like mahi or wahoo to substitute, but you can make it without – it still has such a rich broth and holds up well if you add other veg.
Ingredients
2 stalks fresh lemongrass, tough outer layers removed
1 one inch piece (a man thumb) baby ARTfarm ginger, grated, no peeling necessary
1 one inch piece (a man thumb) baby ARTfarm turmeric, grated, no peeling necessary
3 large kaffir lime leaves
1 – 2 sprigs Thai basil
1 sour orange or other large citrus: all the juice and a tiny bit of the skin oil or zest
6 cups broth – veggie or whatever you’ve got
1 lb. your favorite protein: a pack of firm tofu, cut into 1” or smaller pieces
– or – chicken (boneless breast or thigh), sliced into thin strips
– or – mahi or wahoo, cubed
1 large onion, sliced thin into crescent moons
8 oz. mushrooms (Japanese or whatever you’ve got)
1 13.5-oz. can coconut milk well shaken**
– or – make fresh coconut milk!!! (Crucian Contessa’s recipe)
2 Tbsp. fish sauce (such as nam pla or nuoc nam)
– or – a slurry of 2 Tbspn. miso paste dissolved in some of the broth
– or – 2 Tbsp. Bragg’s Aminos to taste
1/2 pint cherry tomatoes
1-4 finely chopped Thai chili peppers to taste
1/4 cup fresh chopped cilantro leaves with tender stems
a few sour orange or lime wedges (for garnish, if you’re feeling fancy)
——–optional add-ins (we do all of them!!)——-
* 1 cup pumpkin, sliced thin then cubed into chunks
* 1/2 bunch cooking greens (radish tops, kale, chicory etc.), remove hard center ribs, cut leaves into 1″ pieces or julienned
* 4-5 seasoning peppers, seeded and sliced
* 1 bunch radishes or turnips, washed, root sliced into coins, use the tops as greens
* 2 medium bell peppers, seeded and thinly sliced
How to make it
Using the back of a knife, lightly smash lemongrass; fold and bundle it up to about 4-5″ long, to fit in a large sauce pan. Add the broth and bring to a boil. Reduce heat and simmer until flavors are melded, 8–10 minutes. Pull out the lemongrass with tongs and discard, and add microplaned/grated ginger and turmeric to the hot broth.
Add tofu and your big pile of chopped onions, pumpkin, greens, (and seasoning pepper if desired), and return to a boil. Reduce heat, add mushrooms and citrus juice, and simmer, skimming occasionally, until cooked through and onions and pumpkin are soft, 20–25 minutes.
For the last five minutes, turn the heat to low and add radish coins, bell peppers, (chicken/fish if applicable). Simmer until the protein is cooked through, about 3-5 minutes. Ladle some of the hot broth into a teacup and add your miso, stirring until liquified.
Mix in coconut milk, your brown flavor sauce option (fish sauce/miso slurry/aminos), tiny leaves of Thai basil, and kaffir lime leaves. Heat through.
Divide soup among bowls. Serve with garnishes: cherry tomatoes, thinly sliced pieces of thai chili peppers, cilantro, and citrus wedges. OMG it’s so good. If you have any hint of a cold this nutritious soup will blast it out of you!!
*thanks Google Translate. Apologies to Thai people. Hopefully we haven’t said something rude.
** Chef Ken’s coconut tip: if you purchase canned coconut milk, check the fat content (in grams per can, not the percentage). Look for something in the 10+ grams range. Less than that, it can come out too thin – and sometimes canned coconut milk contains emulsifiers that can give it a weird mouth feel.