We sell delicious ripe sweet dragonfruits (also called pitayas) at ARTfarm, but we also occasionally make cuttings available so you can try your hand at dragon farming. These domesticated cousins of the wild night-blooming cerreus are relatively easy plants to grow in the subtropical climate of the Caribbean, and can tolerate full sun or partial shade. Dragonfruit is a climbing cactus vine of spiky green triangular sausages whose care leads to some odd bedtime habits: certain varieties need to be hand pollinated, and the blooms only open at night. This article will get you started, and then you’ll want to search the web for more details. Welcome to our obsession:
Planting Your Dragonfruit Cutting
Water, water, anywhere? Look closely to see what Farmer Luca saw: A tiny anole lizard licking moisture off of a dragonfruit bud in the dry pasture.
Beware of the sharp spines! Your cutting is pretty tough and can wait a few weeks to be planted in a pot or in the soil and start its upward trajectory. In fact, the cut end should be fully cured and dry before planting.
So take your time to find the perfect spot: this desert plant becomes incredibly heavy as it grows up and up, so if you put it on a weak structure the vine will eventually pull it down. The vine can handle shade or full sun, thus a large tree seems like a perfect sturdy natural support; but left to its own devices, the dragonfruit vine will eventually grow high up out of your reach for pollinating and picking the fruit. The roots can adhere to many surfaces and will grow up walls, too. For cultivation practicality, we’ve found a sturdy wooden fence or trellis is best. At ARTfarm we have had better luck on 3-4 foot high fences rather than single-support trellises (as the vine gets heavy, some of our ‘tree shaped’ single-post-supported vines have fallen over when rain events soften the soil). A wattle fence is a simple, attractive, ecofriendly and inexpensive way to create a support for your dragonfruit vines. We made one near the ARTfarm farmstand entrance from manjack cuttings. Whatever growing structure you choose, keep the vines out of reach of livestock and deer, who enjoy munching the juicy interior of the vine segments.
When you’ve found a good spot, take a close look at your dragonfruit cutting: it’s directional. The spines should point up. Plant the cutting’s bottom end 1″ into a one gallon or larger pot to start, with a stake or other temporary support to climb, or plant it directly in the ground near the support where you plan to have your vine grow. Once you see some growth on the top of the cutting, you’ll know it has rooted in the soil.
Dragonfruit Vine Care
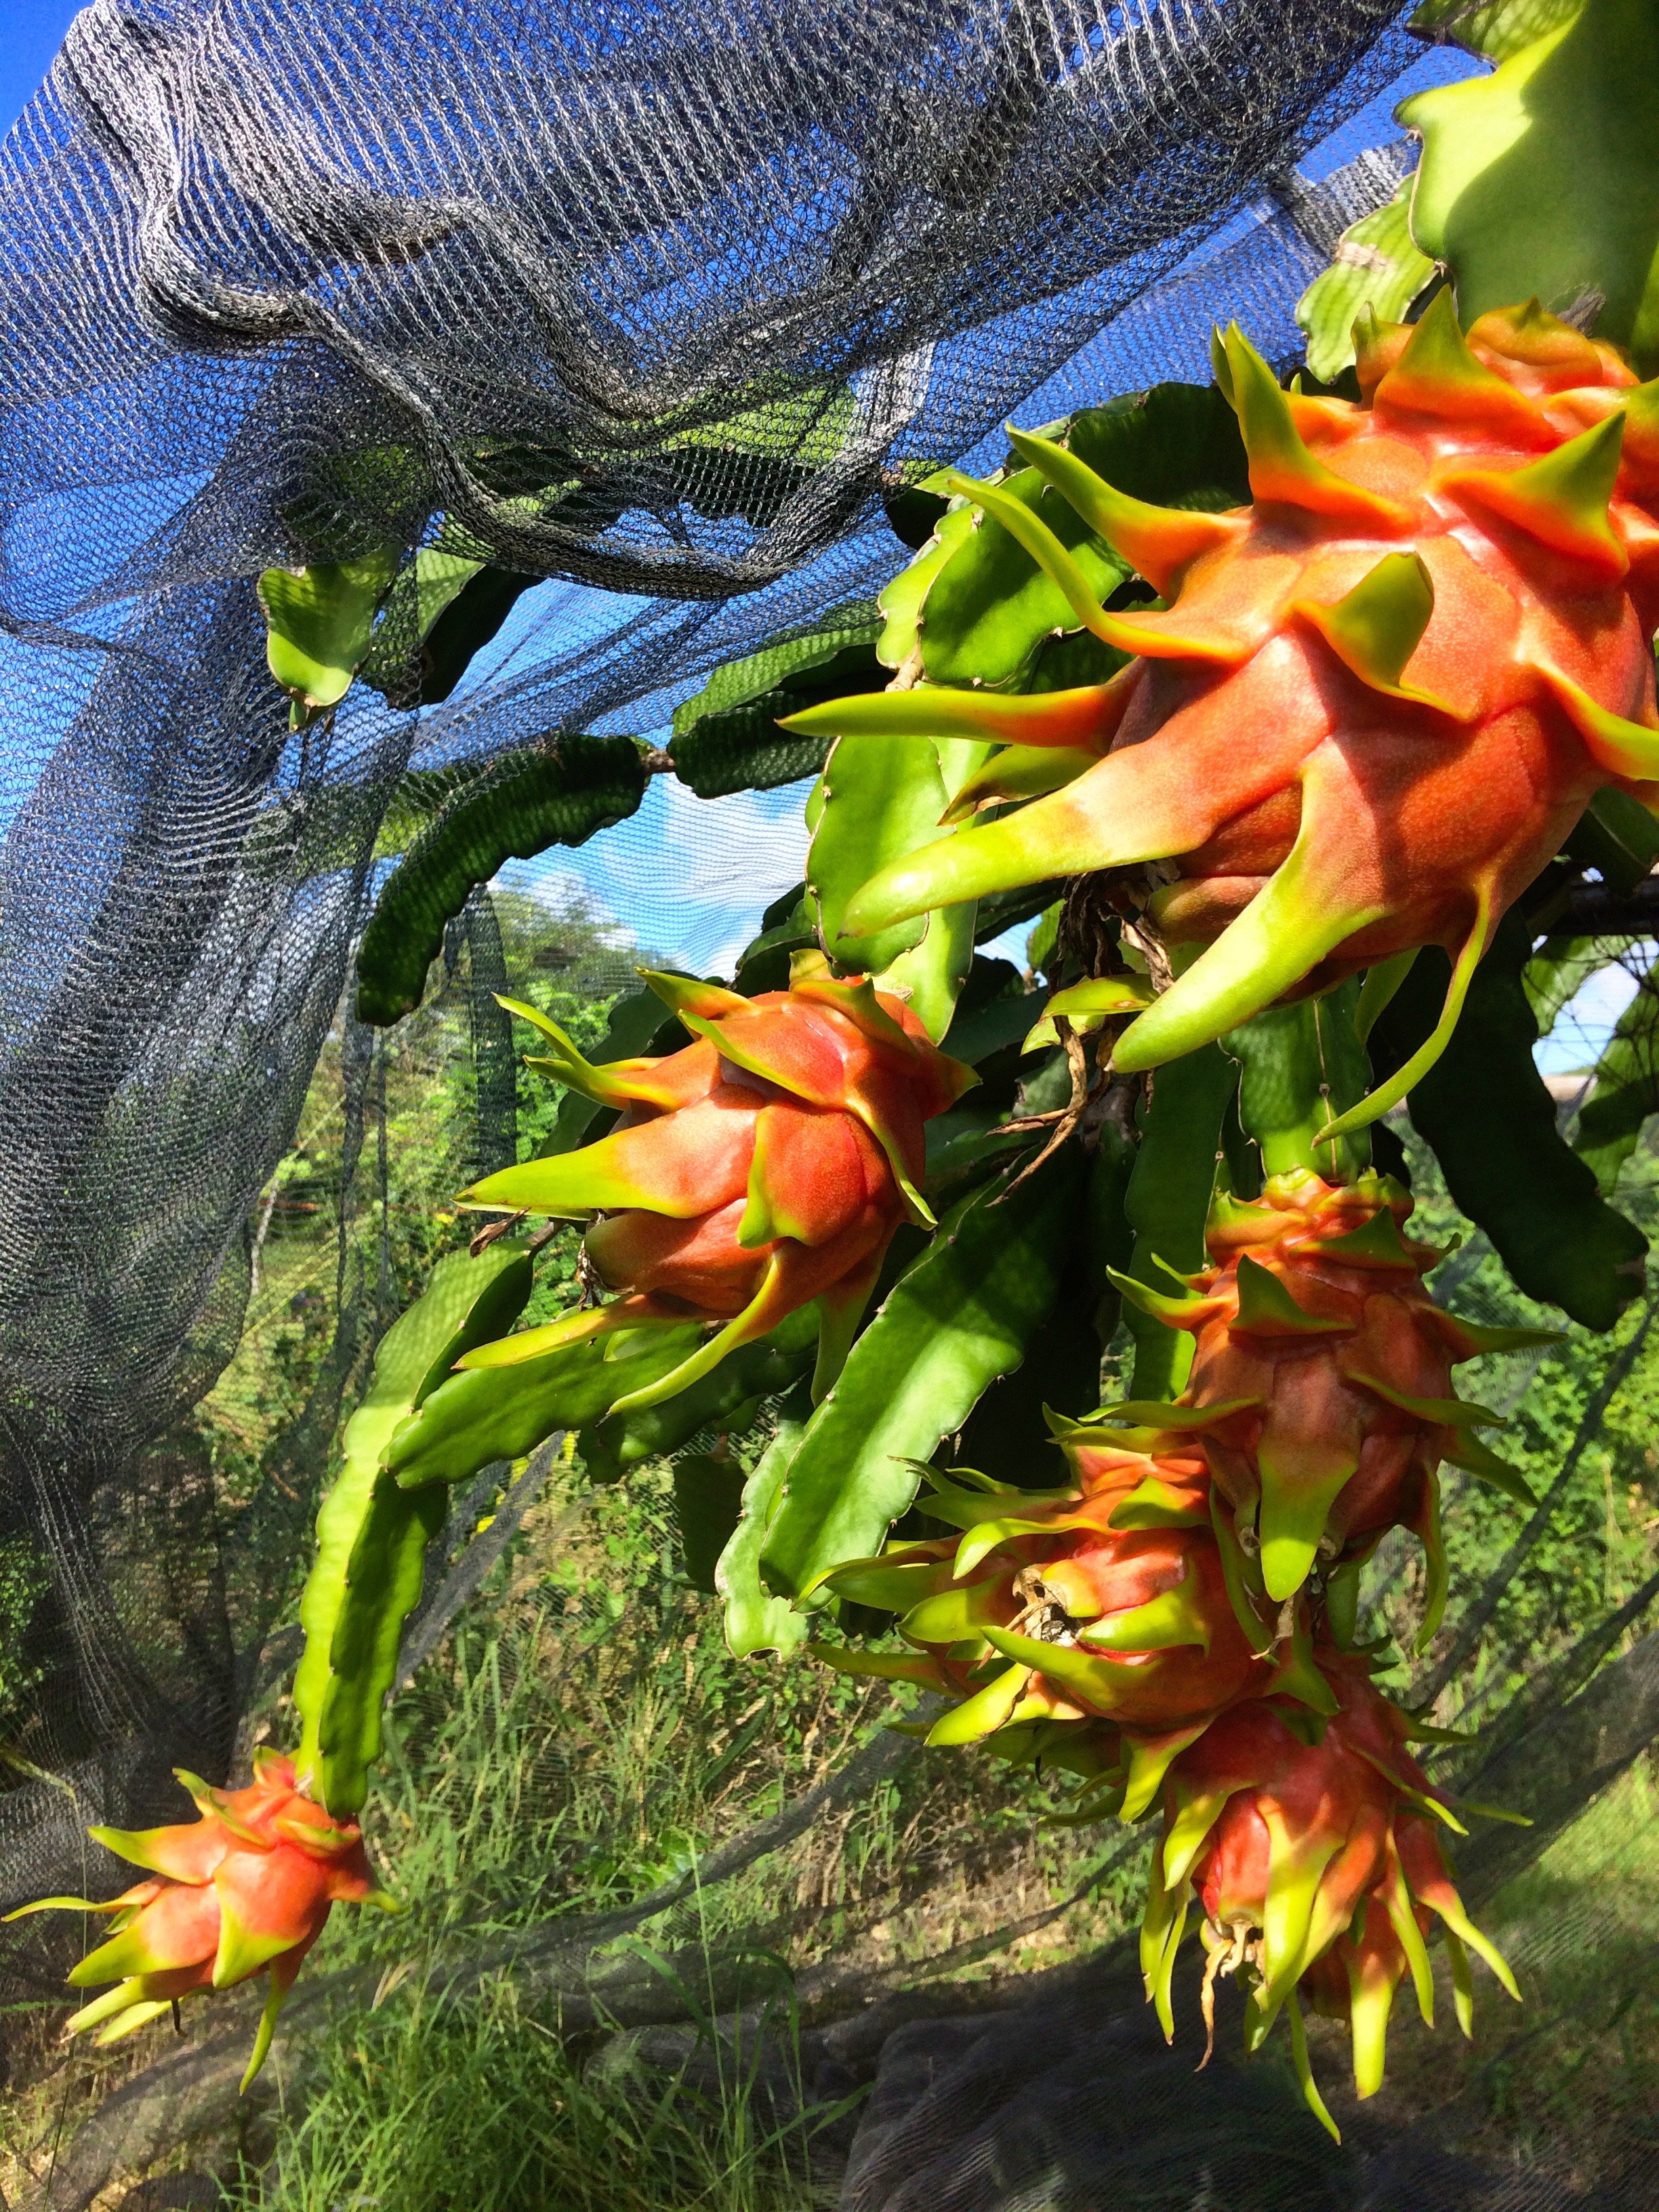
Dragonfruit (pitahaya) ripening on the vine.
These tough desert vines are a relatively slow growing plant so be patient and prepared to wait up to several months before you see initial growth from your cutting.
Dragonfruit vines do need some water, but not as much as other plants. Once well established, especially on trees in a well-drained spot, we find they will survive and thrive without irrigation. They will develop roots all along the green segments, against the support you provide. The vine absorbs water from the air and from the surface they grow on. But depending on conditions they will also need regular watering with good drainage as they get established. They don’t want a wet spot but prefer to dry out between waterings. The smooth green segments of the vine will start to look wrinkly if it is thirsty.
If you prune the dragonfruit vine by cutting in the center of one of the green sections, it will often branch. So if you choose a tall support like a tree or wall, you can chop the growing tip of the vine in half as it grows and it will bush out and start to arc gracefully downward. You can also add more cuttings along the bottom of your structure, to keep the vine dense but within reach. There are industrial dragonfruit farms in Vietnam with thousands of vines on concrete posts, and the profuse spreading growth from the top makes each vine appear like a strange palm tree.
Flowering and Pollinating
Dragonfruit vines put out fruit buds near the tip of their length.
Dragonfruit vines need to grow to a certain overall length before they will flower and fruit. This reproductive effort doesn’t start until the cutting has grown into a fairly substantial vine of six feet or more; it can take up to two years from planting to fruit from cuttings, even longer from seeds. But once they start, you’ll see buds forming along the edges of the outer segments of the vine.
How many of you are old enough to remember the R.E.M. song “Gardening At Night”? Dragonfruit blooms only open after 8pm, and often need to be hand pollinated in order to bear fruit. So forgive us if we’re a little sleepy!
The dragonfruit is the domestic cousin of the rarely-flowering night-blooming cereus. It is a night blooming cactus vine. Like the night-blooming cereus, each large, showy dragonfruit bloom is active for only a single evening, generally opening after dark and closing by mid-morning the following day. Night pollinators such as bats and moths can pollinate the dragonfruit, but for the most reliable harvests you’ll want to research further into how to choose, collect, and apply dragonfruit pollen to your open flowers at night.
Different varieties of dragonfruit pollinate themselves and each other differently. Natural Mystic has a high success of blossoms turning into fruit. Physical Graffiti doesn’t seem to self-pollinate, so it’s not a bad idea to have both varieties planted so they can pollinate each other to make sure fruits will form. Farmer Luca has experimented over the years and now pollinates all his blooms with pollen collected within 24 hours from newly opened Natural Mystic blooms.
Once the flowers are pollinated and have closed, you can prevent end rot in the developing fruit by trimming the excess wet petals from the tip. Birds and other wildlife love delicious ripe dragonfruit, so we often protect the fruit from damage with reusable fabric mesh bags.
Harvest
Heavy basketloads of fresh ripe dragonfruits at ARTfarm
To harvest the ripe dragonfruit for immediate consumption, you can twist the fruit and break it free of the vine. We prefer to use a hand pruning tool and cut the small portion of attached green stem away to free the fruit without damage.
Good luck with your new dragonfruit cutting! Wishing you fun nights of pollinating under the stars!
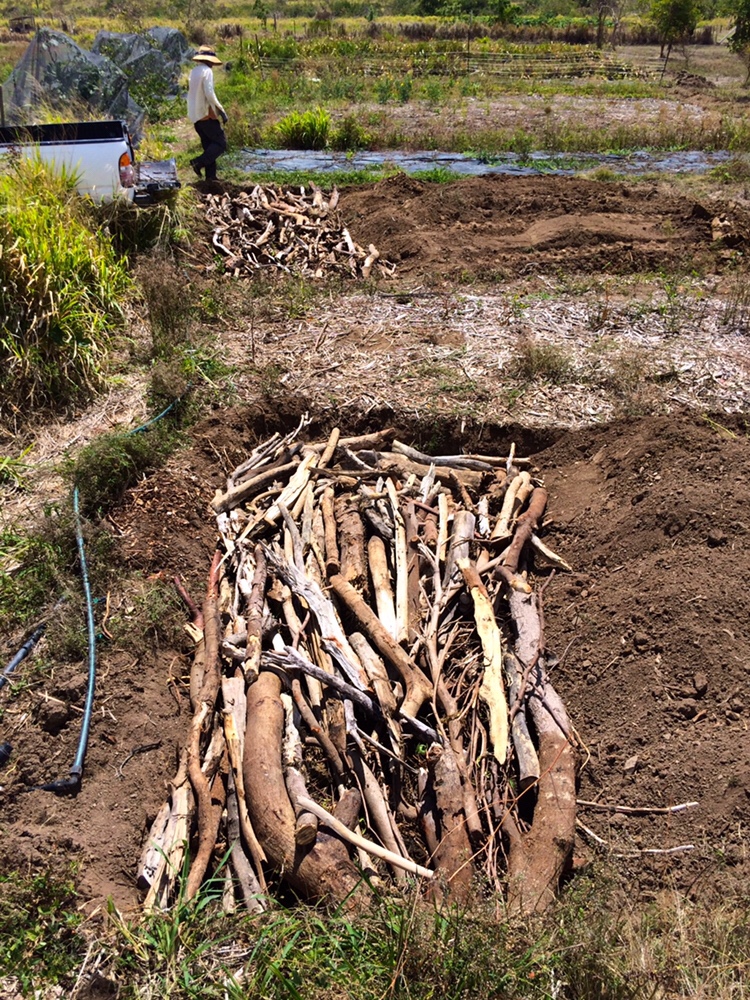
Farmer Bob builds a hugelkultur bed at ARTfarm using leftover storm debris. Hugel beds improve drainage, sequester carbon, reduce cultivation work, increase good fungal growth in soil, save on irrigation water, tidy up storm debris and grow huge healthy plants… What’s not to love? More below on DIYing your own hugel bed at home!
Six months ago, in November 2017, we had newly opened for the season and were giving away birdseed amidst barren trees and broken everything. We were hosting our farmstands on the roadside due to Hurricane Maria damage. Around that time, a journalist from the BVI Beacon, Freeman Rogers, visited us while researching a Caribbean-wide story on climate adaptation and resiliency. He is a humble and thoughtful character and his findings are well-researched and noteworthy. Hope you’ll enjoy a read and share on social media! (It would be great if his story made its way to a major news outlet!) There are mentions of St. Croix and quotes from Luca and other residents in both articles listed in this link, do take a few minutes to read them both, and share: http://bvibeacon.com/sections/climate-change-series/
Saturday farmstand, 10am down the South Shore Road: Plentiful sweet salad mix (thanks to recent, frequent small rain showers that made the size of the lettuce heads grow bigger), a very few slicer and cherry tomatoes, Italian basil, parsley, lemongrass, some seasoning peppers, serrano and chili peppers, lots of fresh ginger and turmeric, cooking greens, bunched arugula, some papaya, some watermelon, some pineapples, and zinnia flowers. For the growers: lots of native trees, bigger pots of rosemary herb, small pineapple slips! For the art lovers: we have performance/raffle tickets to the Caribbean Dance School 2018 show available, Friday and Saturday June 8 & 9 at Island Center, $15!
Okay, get a cuppa and a few minutes for some deep farm talk here: Farmer Luca and Farmer Bob have been busy this week building some new hugelkultur, or “hugel” beds on the farm. And YOU CAN TOO!!! Read on if you like food and want to save the planet!!! The secrets will be revealed!!! Mom! Dad! Uncle Fungus!!?
Hugelkultur is a ridiculously simple permaculture farming technique with a fancy name and multiple benefits: carbon is sequestered, water and fertilizer is conserved, erosion prevented, and messy, organic storm debris such as logs and branches are repurposed and turned into a valuable resource. You make a tidy brushpile, and you bury it in soil. No burning, no chipping. And then you grow food or other plants on it. That’s the whole story. And it’s AMAZING!
A hugel bed is a raised garden bed that is naturally, passively aerated and thus doesn’t need any cultivation (tilling or plowing or other soil preparation) other than mulching and weeding. Hugel beds hold micro-pockets of air and water underground, as the slowly decomposing wood in the center acts like a sponge. Plants growing on top LOVE it. After a rainstorm, the beds require much less irrigation for a looong time. This is a great garden bed technique for the lazy or forgetful gardener, as it is forgiving!
Here’s how it works at ARTfarm: Farmer Luca has modified the typical hugel bed stacking technique for our dry, subtropical latitude and conditions by partially burying the hugelkultur bed into a minor trench in the soil where water can collect. This low spot helps to slow runoff and erosion, conserve water and topsoil, and limits the bed’s exposure to wind and sun. Farmer Luca’s basic process involves the digging of a large, relatively shallow bed area (carefully setting aside the topsoil), the burying of the brush into the hole with that topsoil, and mulching, and it can be done on virtually any scale. Here’s the step-by-step:
Dig a shallow area (18″-30″ deep as you wish) to fit the brushpile you want to bury, reserving the topsoil nearby.
Optionally, you can line the bottom of the hole with compostable plant-based material to help slow down water flowing out of the bottom of your hugel bed. Seaweed adds essential nutrients and minerals (with an added plus – burying kills the stink of decomposing south shore sargasso seaweed!) Also effective on the bottom might be cardboard packing material, leaf litter, grass and yard clippings, or even old cotton clothing.
Add the brush and logs into the hole. The neater you stack ’em, the more you can fit in the bed, which is good. Stack a few inches above the original soil level.
Optionally, if you want to get fancy and improve the bed further you can sprinkle or layer nutrients such as charged bio-char, compost, more seaweed, coconut husks, green waste, some woodchips. We haven’t had time to experiment with this yet!
Replace the removed topsoil back onto the bed to bury the brush and logs. Pack the soil in well – stomp on top or agitate as you go – don’t leave large pockets of air in the bed that will erode in the rain!
Cover the topsoil with a thick, heavy layer of mulch – such as wood chips or hay.
The finished bed will be raised about 8-10″ above the original soil level.
Add drip or microsprinkler irrigation.
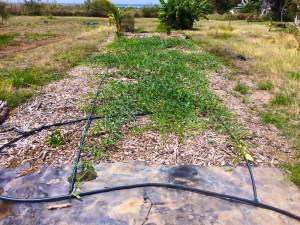
Bigger logs were used in a hugel bed we built in 2016. These logs grew some great watermelons, and are now growing peppers.
Beds can be built consecutively next to one another to create a larger hugel bed growing area, if desired. Our objective was to bury tons of wood to sequester carbon, but you can take a little more time to add even more nutrition to your bed by adding composted materials as suggested above. Think of the worms!!
To start, Farmer Luca chose areas in the gardens to build hugelkultur beds where he had observed the soil was underperforming – that is, where crops were less successful. These spots, he discovered as he excavated, had very hard, compacted clay-like subsoil. If you’re not sure how your soil is performing, you may want to choose a spot that tends to collect water, if that is an option.
The type of wood used in the bed is not terribly important, although known toxic tropical varieties such as manchineel apple are best avoided. A mix of both harder and softer wood varieties (mahogany, manjack and palm trunk, for example) is probably most effective. It’s better to use both large and small sized wood pieces (both logs and branches), but whatever you have will work. Fresh cut wood is arguably better in the short term since it already contains a lot of moisture, but it can also start growing in the bed (we’re talking about you, Beach Maho and Madre-de-Cacao)! We have mostly used old, dry wood materials and that works too. Fine material such as wood chips alone might decompose too quickly, whereas larger diameter hard logs offer a more slow-release effect over the course of years. Hugel beds are a monster sized, long-acting injection of fertile organic matter into your garden’s topsoil!
The quality of the available nutrition for plants in hugel beds change over time, tending to improve for a wider variety of crops as the interior wood composts into humus, and fungal growth and diversity inside the bed starts to really kick in. That’s yet another big win-win of hugelkulture: a biodiverse world of fungus, that create mycorrhizae, a working symbiosis with fungi and living plants, creating more bioavailability of nutrients and breaking down dead plant material. (Think kombucha or sauerkraut!) We had noticed years ago on the farm that impromptu/accidental hugelkultur beds created by the bulldozing of old brush piles with some topsoil resulted in an almost bluish-green color, drought resistance and vitality in the grasses that grew on those spots, even after the pile itself was moved away. Go fungi!!!
After establishing the first hugel beds, Luca started some simple trialing of different crops into the hugel beds with every transplant set. So every time a few hundred seedlings went into the drip-irrigated garden rows, he’d also put a few plants from that same batch into the hugel beds. The hugel plants tended to be noticeably healthier, larger and stronger, without the additional fertilizing and regular daily irrigation that the row plants got. WOW!
This finished hugel bed, with young watermelon vines, is approximately 15′ wide by 55′ long.
Crop plants that seemed to best tolerate the environment of a new, freshly layered hugel bed included pumpkin, zucchini, watermelon, herbs, and peppers. Corn, sweet potato and jicama (a crispy root vegetable) were not as successful in the newest beds. Our oldest hugel beds were built during the extreme drought of 2015, and exploded with zucchini in their first year. Those three-year-old beds are now successfully supporting lettuce and brassicas like kale. (Whenever we have extra tree trimmings and a little time, we build another hugel bed.) Even more exciting, Luca has been trialing fruit trees in a few of those older hugel beds. Citrus, mango, avocado and coconut trees are so far very healthy and show robust growth. We are especially excited about the success of the avocado, which is a variety that normally requires heavy watering and has never really taken to ARTfarm’s high-drainage, rocky south shore soil and dry conditions.
Farmer Luca uses water-conserving drip irrigation or microsprinklers on his hugel beds, so the plants do receive some irrigation in dry periods, but only every 3 – 4 days instead of daily, as the row crops require. And if it rains heavily, the hugel beds can go for weeks without watering. In our super dry conditions on the South Shore, this is essential resource conservation. So a new hugel bed made from dry woods will need a bit more irrigation, but once it gets a good heavy rain, that seems to prime the bed, and water is soaked up and maintained inside for an extended time.
Slugs and snails and termites, oh my! With all of the fantastic nutrition available in a hugel bed, of course there may be some less welcome visitors. Our experience has been that, given a bit of time, balance happens and the pest invaders leave of their own accord. Here’s what happened:
There was a period after the 2015 drought broke when conditions were very wet on the farm, and our existing recent infestation of slugs and snails (who hitchhiked here in some donated pots in 2014) started booming. These creatures were probably attracted to the hugel beds’ moisture as conditions began to dry out, and were feeding on the leaves and fruit of the crop plants. Farmer Luca stopped planting and irrigating in that bed for about six months and gave it a lot more mulch, and the problem resolved itself. As for the slimy population of intruders, they were virtually wiped out all over the farm after another year or so by another stealthy predator, possibly mongoose or night herons.
Termites seem to be the biggest fear with this technique. We have had surprisingly little issue with them except for one hugel bed that was built only 3 meters away from an existing huge woodpile with a very large termite colony that was extremely active and untreated. They built tunnels above and below ground into that hugel bed. After a few years, they disappeared from the bed. The termites did NOT affect the watermelon crop in that bed, but they probably did a lot to aerate and decompose the wood within! I might not build an enormous hugel bed right under my untreated wood house, but it seems that generally speaking we have not seen termites sprouting up in these beds despite having active colonies around the farm. In general, termites are always around whether we see them or not, so the presence of a hugel bed is not going to create termites. It might even divert them from structures! Here’s a discussion about it: https://permies.com/t/28384/Termites-Hugelbeds
Gungaloes (large armored millipedes) are also attracted to the hugel beds, which is great because they can improve soil (much in the way that earthworms do). But they would sometimes eat the skin off the stem of very young plants, girdling and killing them. The solution was to pull the thick mulch layer back from around the seedling, and/or to put a small ring of stones around the base of the plant to protect it.
Farmer Luca would love to see agricultural researchers in the Caribbean do more experimentation and dedicated trials with hugelkultur beds. Unfortunately, since ARTfarm is a commercial production farm, we don’t have the time or staff to devote to approaching all the variables from a purely scientific method or collecting more than anecdotal data – but the early results show that this technique is incredibly productive while solving a post-storm solid waste problem at the same time.
It’s dry out here! Today’s pungent harvest: Sweet salad mix, baby arugula, baby and regular spicy salad mixes, arugula, onions, scallions, cilantro, Italian basil, lots of tomatoes, slicers and heirlooms, cherry tomatoes, and the last of the figs for a while.
Q: Why aren’t your salad greens as sweet this week as they were last week? Why are the stems larger/smaller? Why isn’t the spicy as spicy as it was last time? etc. etc….?
A: While one could chalk this up to simple nostalgia, it’s more likely that variations are due to two main reasons:
(1) Mother nature’s treatment of our crops is the primary source of this shift in taste from week to week. Even as our recipes remain unchanged, small changes in the weather can affect the taste of our salad mix.
When temperatures are hotter during a portion of the growth cycle of the lettuce heads in our fields, they respond as many living beings do under stress: they attempt to defend themselves from being eaten as they try to propagate. Lettuce will tend to take on a more bitter flavor in hot weather as it accelerates toward the bolting and seeding cycle of its life (as it would during hot late summer months in the cooler parts of the world). If we encounter cooler and rainier weather, the lettuce will be sweeter. Even a brief few days of intense heat can alter the taste of plants. And variations in weather now can affect the salad flavor two or three weeks from now, as the plants are in their growth cycle.
Spicy greens become more peppery when the weather is very hot and dry, and will taste milder when we’ve had a lot of wet weather. Our formulas for the types of greens and their quantities in the various mixes stays consistent from harvest to harvest, but the weather can change the flavors in the bag of salad you take home.
Occasionally we do have to change the formulation of a salad mix because seed is not available for some of the tasty baby greens that add so much flavor to our mixes. We find a substitution that is similar, but this can also change the taste of our salad mixes over the course of the season.
(2) The other factor that comes into play in the consistency of ARTfarm salad greens from bag to bag is what we like to call the Jackson Pollock effect.
When we make the salad mix we use a very large sanitized stainless surface and mix in many different baby mesclun greens with multiple large chopped lettuce varieties.
When creating his splatter paint pop art creations of the 1960s, Jackson Pollock employed a similar technique. He would toss different colors in random patterns throughout his large canvases.
What we do next at ARTfarm is essentially like taking that large amazing Jackson Pollock painting and cutting it up into many small pieces. Each portion of the canvas represents a bag of ARTfarm salad mix. Some bags will have more large pieces of stem from the base of the lettuce head; other bags will contain a little bit more of the baby mesclun greens; others will be a perfect blend of all the different ingredients that we put into the salad mix. Every bag is a little different because they’re all prepared by hand, and the weather, the secret intentions of mother nature, and the randomness of our process ensure that your experience will always be fresh!
We know that our customers seek us out because they want real produce that tastes like the place it was grown. We know you can handle a little variety. But, if you ever purchase a bag of salad greens from ARTfarm that you find inedible, please bring it back to us. We’d always like to hear from our customers, good or bad, how you feel about our products, and if we’ve goofed and a product is not up to our normal level of quality, we would be happy to replace it with something you find tastier.
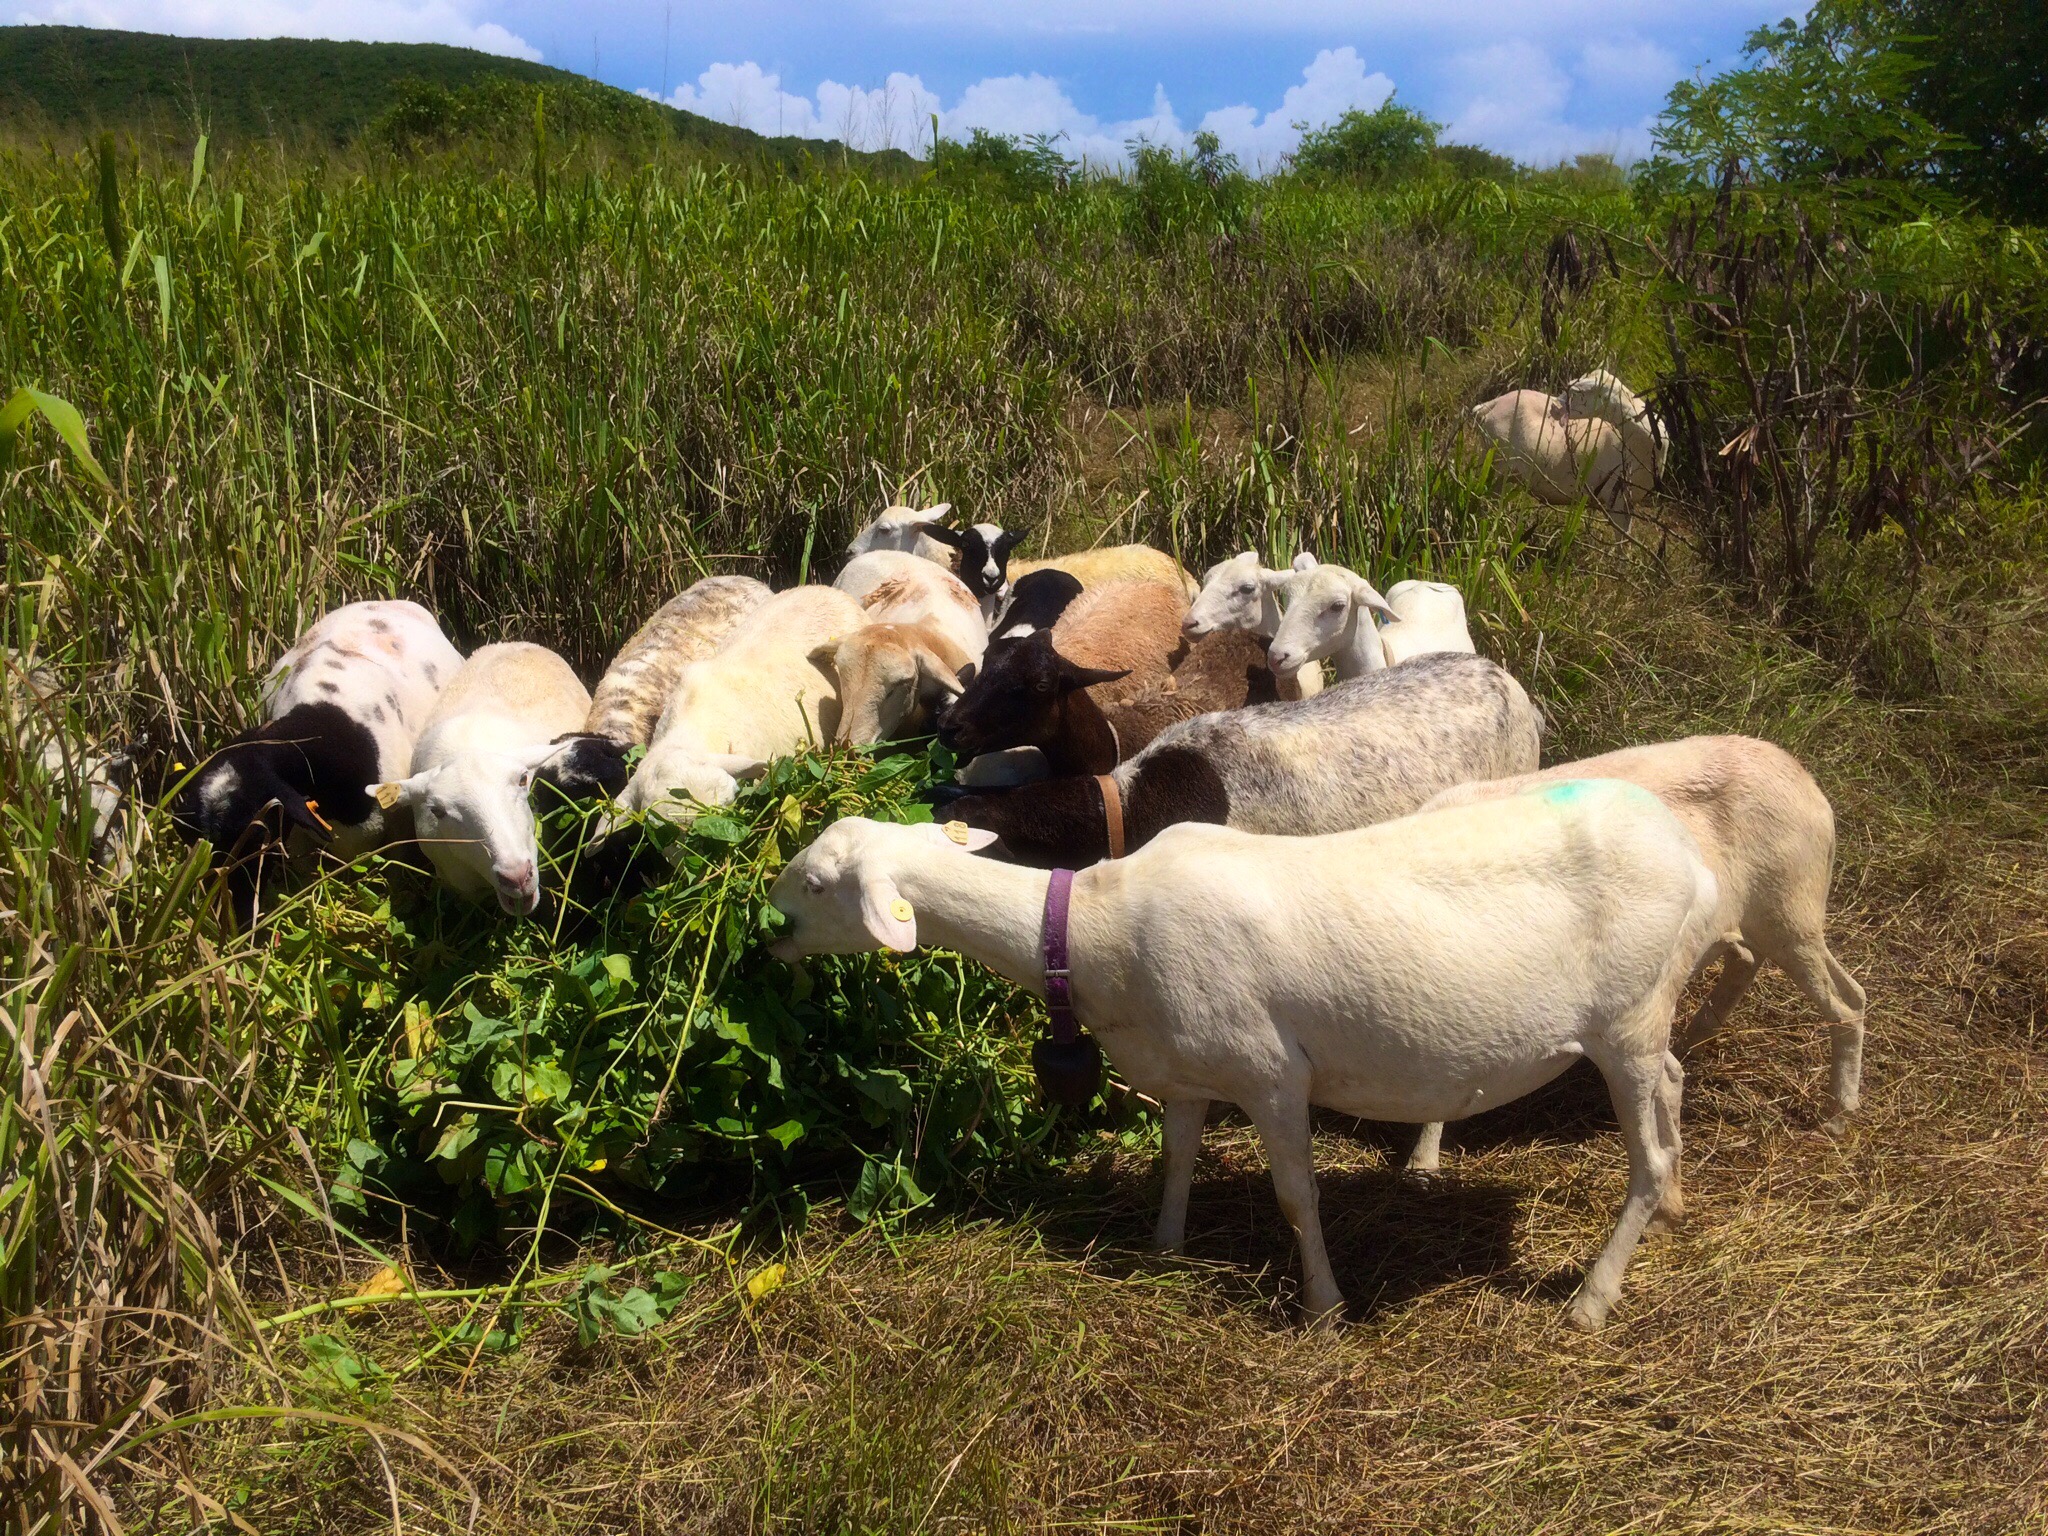
Over the sleepy summer and fall break, we grew some cover crops in the gardens at ARTfarm to help improve the soil for next year’s crops. Climbing up the golden dried stalks of harvested sweet corn were some large and very happy cowpea vines (Vigna unguiculata) replete with big green bean pods.
There is almost nothing in this world that our sheep enjoy more than fresh cowpea vines and beans. Friday afternoon we removed the upper part of the cowpea plants and offered them to all three groups of ovines. OMM NOM NOM NOM!
Cowpeas are a forage that is high in protein, helping the sheep to grow and put on weight. The roots of the cowpea plants fix nitrogen into the soil.
Your ARTfarmers are busy planning next year’s season and preparing garden areas to receive young seedlings. We have been blessed with some beautiful rainfall in September. We look forward to seeing all of you in just a few more weeks when the farmstand reopens. Watch this space!